
Hello Folks ,
In this blog, we will delve into the process of sending Custom events to your Customer Data Platform (CDP) using Next.js.
If you are new to CDP and next , you can follow my blog for setting CDP with next js and Identity Event to CDP .
Let’s learn what is custom event in Sitecore CDP and why they are used.
Custom Events in Sitecore CDP:
A custom event in Sitecore Customer Data Platform (CDP) refers to user-defined actions or interactions that are not covered by the standard events provided by Sitecore. These events can be tailored to specific business needs and allow for tracking and responding to unique user behaviors on your website or application.
Why Custom Events are Used:
- Personalization: Custom events help in capturing specific user interactions that can be leveraged for personalized experiences. For instance, tracking when a user views a particular product category multiple times can trigger personalized product recommendations.
- Enhanced Analytics: They provide deeper insights into user behavior by allowing businesses to track actions that are relevant to their specific goals. This helps in understanding customer preferences and improving the overall customer journey.
- Automation: Custom events can trigger automated workflows and marketing campaigns. For example, if a user abandons their shopping cart, a custom event can initiate an automated email reminder.
- Flexibility: They offer the flexibility to monitor and measure unique metrics that are specific to your business, providing a more tailored approach to data analysis and customer engagement.
By leveraging custom events in Sitecore CDP, businesses can gain more granular insights, improve customer engagement, and drive more effective marketing strategies.
Custom Events in Next.js
There are some predefined custom events like “ADD,” “CONFIRM,” and “CHECKOUT.”
Additionally, Sitecore provides more custom events, which you can learn about here.
ADD
The “ADD” event in Sitecore CDP refers to a custom event that tracks specific user actions, such as adding an item to a cart. This event captures relevant details like product ID, quantity, price, and timestamp, and sends this data to Sitecore CDP via an API call for user behavior analysis and personalized marketing efforts.
Let’s look into code for this event
import { useState } from "react";
import { engage } from "./api/engage";

export default function Form() {
    const [email, setEmail] = useState("");

    const handleEmail = (e) => {
        setEmail(e.target.value);
    };

    const handleSubmit = async (e) => {
        e.preventDefault();

        const eventData = {
          channel: "WEB",
          currency: process.env.CURRENCY,
          pointOfSale: process.env.POC,
          language: "EN",
          page: "form",
          email,
          identifiers: [
              {
                  id: email,
                  provider: "BXLP"
              }
          ]
        };

        const extensionData = {
            DataBaseID: "123"
        };

        // Send IDENTITY event to Sitecore CDP
        await engage.identity(eventData, extensionData);
        alert("Your Guest is created");
    };
    const handleClickAddEvent = async () => {
        const eventData = {
          channel: "WEB",
          currency: process.env.CURRENCY,
          pointOfSale: process.env.POC,
          language: "EN",
          page: "products",
          email,
          product: {
              name: "GHT 84 Lace Sneaker",
              type: "FOOTWEAR",
              item_id: "SHOES_8475GHT",
              productId: "example_product_id",
              referenceId: "MA-490094",
              orderedAt: new Date().toISOString(),
              quantity: 1,
              price: 7.99,
              currency: process.env.CURRENCY,
              originalPrice: 7.79,
              originalCurrencyCode: process.env.CURRENCY,
          }
        };
        const extensionData = {
          customKey: "Test"
        };
        await engage.event("ADD", eventData, extensionData);
        alert("added")
    };

    return (
        <form >
            <label>
                <span>Email:</span>
                <input type="email" required onChange={handleEmail} value={email} />
            </label>

            <button onClick={handleSubmit}>Subscribe</button>
            <button onClick={handleClickAddEvent}>ADD</button>

        </form>
    )
};
You can replace this code in Form.js page , if you are following my blog For Event in Next js .
If you are new to this , create a Page name “Form.js” and replace this code there .
let’s understand this code
const handleClickAddEvent = async () => {
        const eventData = {
          channel: "WEB",
          currency: process.env.CURRENCY,
          pointOfSale: process.env.POC,
          language: "EN",
          page: "products",
          email,
          product: {
              name: "GHT 84 Lace Sneaker",
              type: "FOOTWEAR",
              item_id: "SHOES_8475GHT",
              productId: "example_product_id",
              referenceId: "MA-490094",
              orderedAt: new Date().toISOString(),
              quantity: 1,
              price: 7.99,
              currency: process.env.CURRENCY,
              originalPrice: 7.79,
              originalCurrencyCode: process.env.CURRENCY,
          }
        };
        const extensionData = {
          customKey: "Test"
        };
        await engage.event("ADD", eventData, extensionData);
        alert("added")
    };
Declares an asynchronous function named handleClickAddEvent. The async keyword indicates that the function will handle asynchronous operations, allowing the use of await within the function.
Let’s Constructs an object eventData containing detailed information about the event being tracked.
- Channel: Specifies that the event is occurring on the web (
"WEB") . You can learn more about Channel here. - Currency: You can find currency value in company information under setting section. you can get more details here .
- Point of Sale: To find the name of your point of sale, in Sitecore CDP, on the navigation pane, click on Setting icon > Points of Sale > Name.
- Language: You can find language value in company information under setting section. you can get more details here .
- Page: Indicates that the event is related to the
"products"page. - Email,Name,Title : In this section you can update user details of guest . you can read more here .
- Product: An object describing the product being added:
- Name: The name of the product that the user added to the cart. This is required field.
- Type: The type of product that the user added to the cart. This is required field.
- Item ID: The item ID of the product that the user added to the cart. Used in Extract, Transform, Load (ETL) data integration to create the order. This is required field.
- Product ID: The ID of the product that the user added to the cart. Used in Analytics for reporting. This is required field.
- Reference ID: An ID generated by your organization to reference the order item. This is required field.
- Ordered At: The current date and time in ISO format, generated using
new Date().toISOString().This is required field.. - Quantity: The number of units of the product that the user added to the cart.. This is required field.
- Price: The unit price of the product . This is required field.
- Currency: You can find currency value in company information under setting section. you can get more details here .This is required field.
- Original Price: the original price of the product.
- Original Currency Code: You can find currency value in company information under setting section. you can get more details here .
Calls the engage.event method , passing "ADD" as the event type, along with the eventData and extensionData objects.
when you run this code ,this is how a page looks like
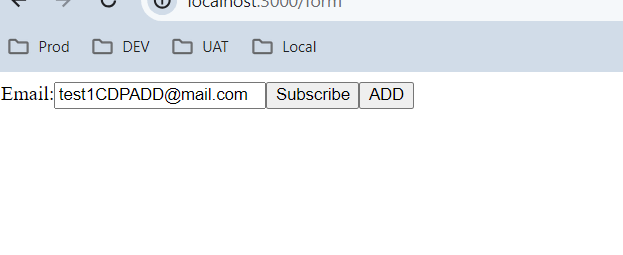
When you click on ADD button , it will add an item in cart and add an event in guest list
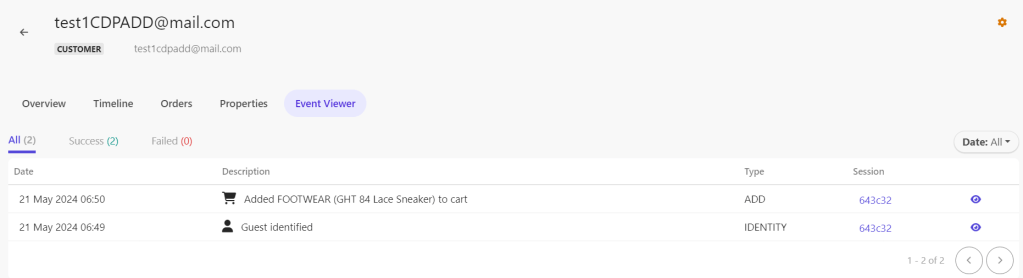
This will add “ADD” event , learn more about this event here .
Confirm
The “Confirm” event in Sitecore CDP is a custom event that tracks user actions confirming a transaction or action, such as completing a purchase or submitting a form. This event records details like transaction ID, amount, and timestamp, and sends this data to Sitecore CDP for further processing and analytics.
Let’s look into code for this event
import { useState } from "react";
import { engage } from "./api/engage";

export default function Form() {
    const [email, setEmail] = useState("");

    const handleEmail = (e) => {
        setEmail(e.target.value);
    };

    const handleSubmit = async (e) => {
        e.preventDefault();

        const eventData = {
          channel: "WEB",
          currency: process.env.CURRENCY,
          pointOfSale: process.env.POC,
          language: "EN",
          page: "form",
          email,
          identifiers: [
              {
                  id: email,
                  provider: "BXLP"
              }
          ]
        };

        const extensionData = {
            DataBaseID: "123"
        };

        // Send IDENTITY event to Sitecore CDP
        await engage.identity(eventData, extensionData);
        alert("Your Guest is created");
    };
    const handleClickAddEvent = async () => {
        const eventData = {
          channel: "WEB",
          currency: process.env.CURRENCY,
          pointOfSale: process.env.POC,
          language: "EN",
          page: "products",
          email,
          product: {
              name: "GHT 84 Lace Sneaker",
              type: "FOOTWEAR",
              item_id: "SHOES_8477GHT",
              productId: "example_product_id",
              referenceId: "MA-490094",
              orderedAt: new Date().toISOString(),
              quantity: 1,
              price: 7.99,
              currency: process.env.CURRENCY,
              originalPrice: 7.79,
              originalCurrencyCode: process.env.CURRENCY,
          }
        };
        const extensionData = {
          customKey: "Test"
        };
        await engage.event("ADD", eventData, extensionData);
        alert("added")
    };
    const handleClickConfirmEvent = async () => {
        const eventData = {
          channel: "WEB",
          currency: process.env.CURRENCY,
          pointOfSale: process.env.POC,
          language: "EN",
          page: "checkout",
          email,
          product: [
            { item_id: "SHOES_8477GHT" }
          ]
        };
        const extensionData = {
          customKey: "Test"
        };
        await engage.event("CONFIRM", eventData, extensionData);
        alert("Confirm")
    };

    return (
        <form >
            <label>
                <span>Email:</span>
                <input type="email" required onChange={handleEmail} value={email} />
            </label>

            <button onClick={handleSubmit}>Subscribe</button>
            <button onClick={handleClickAddEvent}>ADD</button>
            <button onClick={handleClickConfirmEvent}>Confirm</button>

        </form>
    )
};
You can replace this code in Form.js page , if you are following my blog For Event in Next js .
If you are new to this , create a Page name “Form.js” and replace this code there .
let’s understand this code
const handleClickConfirmEvent = async () => {
        const eventData = {
          channel: "WEB",
          currency: process.env.CURRENCY,
          pointOfSale: process.env.POC,
          language: "EN",
          page: "checkout",
          email,
          product: [
            { item_id: "SHOES_8477GHT" }
          ]
        };
        const extensionData = {
          customKey: "Test"
        };
        await engage.event("CONFIRM", eventData, extensionData);
        alert("Confirm")
    };
Declares an asynchronous function named handleClickConfirmEvent. The async keyword indicates that the function will handle asynchronous operations, allowing the use of await within the function.
Let’s Constructs an object eventData containing detailed information about the event being tracked.
- Channel: Specifies that the event is occurring on the web (
"WEB") . You can learn more about Channel here. - Currency: You can find currency value in company information under setting section. you can get more details here .
- Point of Sale: To find the name of your point of sale, in Sitecore CDP, on the navigation pane, click on Setting icon > Points of Sale > Name.
- Language: You can find language value in company information under setting section. you can get more details here .
- Page: Indicates that the event is related to the
"products"page. - Email,Name,Title : In this section you can update user details of guest . you can read more here .
- Product: An object describing the product being added:
- Item ID: Use the item ID from
product.item_idin the event data object for the ADD event. This is required Field .
- Item ID: Use the item ID from
Calls the engage.event method , passing "CONFIRM" as the event type, along with the eventData and extensionData objects.
when you run this code ,this is how a page looks like
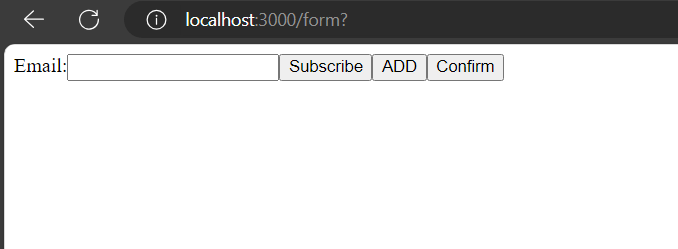
When you click on Confirm button , it will confirm an item in cart and add an event in guest list
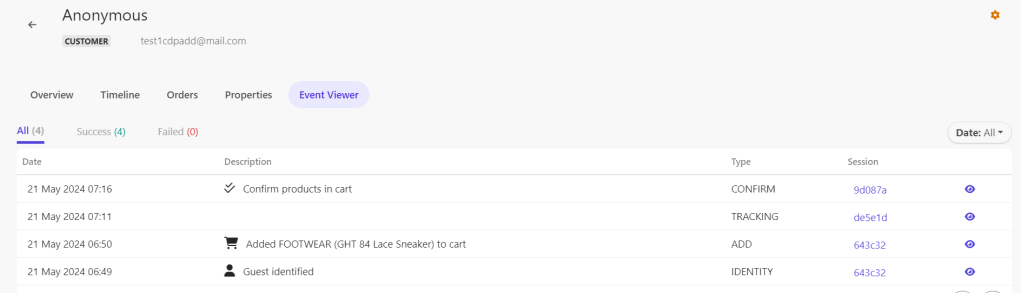
This will add “CONFIRM” event , learn more about this event here .
Checkout
The “Checkout” event in Sitecore CDP is a custom event that tracks when a user initiates the checkout process. It captures details such as cart contents, total amount, and user ID, and sends this data to Sitecore CDP for analysis and personalized marketing strategies.
Let’s look into code for this event
import { useState } from "react";
import { engage } from "./api/engage";

export default function Form() {
    const [email, setEmail] = useState("");

    const handleEmail = (e) => {
        setEmail(e.target.value);
    };

    const handleSubmit = async (e) => {
        e.preventDefault();

        const eventData = {
          channel: "WEB",
          currency: process.env.CURRENCY,
          pointOfSale: process.env.POC,
          language: "EN",
          page: "form",
          email,
          identifiers: [
              {
                  id: email,
                  provider: "BXLP"
              }
          ]
        };

        const extensionData = {
            DataBaseID: "123"
        };

        // Send IDENTITY event to Sitecore CDP
        await engage.identity(eventData, extensionData);
        alert("Your Guest is created");
    };
    const handleClickAddEvent = async () => {
        const eventData = {
          channel: "WEB",
          currency: process.env.CURRENCY,
          pointOfSale: process.env.POC,
          language: "EN",
          page: "products",
          email,
          product: {
              name: "GHT 84 Lace Sneaker",
              type: "FOOTWEAR",
              item_id: "SHOES_8490GHT",
              productId: "example_product_id",
              referenceId: "MA-490094",
              orderedAt: new Date().toISOString(),
              quantity: 1,
              price: 7.99,
              currency: process.env.CURRENCY,
              originalPrice: 7.79,
              originalCurrencyCode: process.env.CURRENCY,
          }
        };
        const extensionData = {
          customKey: "Test"
        };
        await engage.event("ADD", eventData, extensionData);
        alert("added")
    };
    const handleClickConfirmEvent = async () => {
        const eventData = {
          channel: "WEB",
          currency: process.env.CURRENCY,
          pointOfSale: process.env.POC,
          language: "EN",
          page: "checkout",
          email,
          product: [
            { item_id: "SHOES_8490GHT" }
          ]
        };
        const extensionData = {
          customKey: "Test"
        };
        await engage.event("CONFIRM", eventData, extensionData);
        alert("Confirm")
    };
    const handleClickCheckoutEvent = async () => {
        const eventData = {
          channel: "WEB",
          currency: process.env.CURRENCY,
          pointOfSale: process.env.POC,
          language: "EN",
          page: "home",
          email,
          reference_id: "MA-490094",
          status: "PURCHASED"
        };
        const extensionData = {
          customKey: "customValue"
        };
        await engage.event("CHECKOUT", eventData, extensionData);
        alert("checkout")
    }
    return (
        <form >
            <label>
                <span>Email:</span>
                <input type="email" required onChange={handleEmail} value={email} />
            </label>

            <button onClick={handleSubmit}>Subscribe</button>
            <button onClick={handleClickAddEvent}>ADD</button>
            <button onClick={handleClickConfirmEvent}>Confirm</button>
            <button onClick={handleClickCheckoutEvent}>Checkout</button>

        </form>
    )
};
You can replace this code in Form.js page , if you are following my blog For Event in Next js .
If you are new to this , create a Page name “Form.js” and replace this code there .
let’s understand this code
 const handleClickCheckoutEvent = async () => {
        const eventData = {
          channel: "WEB",
          currency: process.env.CURRENCY,
          pointOfSale: process.env.POC,
          language: "EN",
          page: "home",
          email,
          reference_id: "MA-490094",
          status: "PURCHASED"
        };
        const extensionData = {
          customKey: "customValue"
        };
        await engage.event("CHECKOUT", eventData, extensionData);
        alert("checkout")
    }
Declares an asynchronous function named handleClickCheckoutEvent. The async keyword indicates that the function will handle asynchronous operations, allowing the use of await within the function.
Let’s Constructs an object eventData containing detailed information about the event being tracked.
- Channel: Specifies that the event is occurring on the web (
"WEB") . You can learn more about Channel here. - Currency: You can find currency value in company information under setting section. you can get more details here .
- Point of Sale: To find the name of your point of sale, in Sitecore CDP, on the navigation pane, click on Setting icon > Points of Sale > Name.
- Language: You can find language value in company information under setting section. you can get more details here .
- Page: Indicates that the event is related to the
"products"page. - Email,Name,Title : In this section you can update user details of guest . you can read more here .
- Reference_id : The order ID for which this checkout is happening.
- Status : The order status.
Calls the engage.event method , passing "CHECKOUT" as the event type, along with the eventData and extensionData objects.
when you run this code ,this is how a page looks like
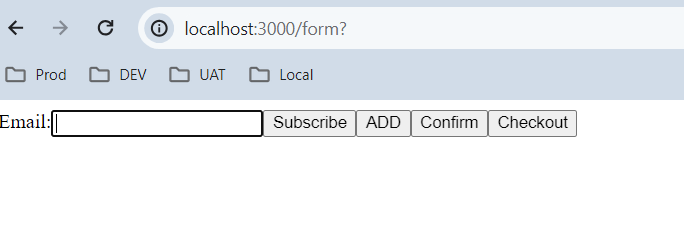
When you click on Checkout button , it will checkout an item from cart and add an event in guest list

This will add “CHECKOUT” event , learn more about this event here .
Conclusion
Integrating Sitecore CDP with your Next.js application allows you to leverage powerful customer data and insights, enabling personalized and effective customer experiences. By sending custom events to Sitecore CDP, you can capture meaningful interactions that provide a more comprehensive view of user behavior. This data can be utilized for advanced analytics, segmentation, and targeted marketing campaigns.
Best Practices
- Consistent Naming Conventions: Use clear and consistent naming conventions for your custom events to maintain readability and ease of management.
- Performance Considerations: Optimize the timing of your event tracking to avoid impacting the user experience, such as batching events or using asynchronous requests.
- Privacy Compliance: Ensure that your event tracking respects user privacy regulations such as GDPR or CCPA by implementing consent management and data anonymization where necessary.
- Event Enrichment: Enrich your events with contextual data to provide deeper insights, such as including metadata about the page or user attributes.
- Testing and Monitoring: Regularly test and monitor your event tracking implementation to catch any issues early and ensure accurate data collection.
By following these guidelines and the detailed steps outlined in this blog, you can effectively capture and utilize custom events in Sitecore CDP from your Next.js application. This integration empowers you to create a more personalized and engaging user experience, driving higher customer satisfaction and business success.
References
- https://doc.sitecore.com/cdp/en/developers/api/engage-identity.html
- https://doc.sitecore.com/cdp/en/developers/api/identity-event.html
- https://doc.sitecore.com/cdp/en/developers/api/extension-data-object.html
- https://doc.sitecore.com/cdp/en/developers/api/sending-orders-using-the-engage-sdk.html
- https://doc.sitecore.com/cdp/en/developers/api/sending-orders-using-the-engage-sdk.html
Happy Coding 😊


Leave a comment